Monday, 10 October 2011

Felt Pot Experiments continue

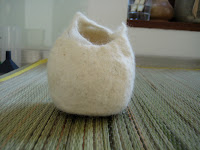
Today's challenge is to add colour and to see whether the tumble dryer part of the process can be used more extensively. Same mould of tights and beans was used as a starting point. So the first pot today uses red as the first layer of colour, then dark chocolate brown to build up the body. I gave this some work by hand to start off the process, then put it in the tumble dryer for about 30 minutes. I ended up with a tight 'egg'. I cut off the top with a scalpel and tipped out the beans.


I don't think this is particularly successful. The felt is lumpy and the colour inside isn't particularly strong. It does look good as work in progress! Think I'll go back to doing more of the felting by hand as you can control the quality.

I also made a white pot for decoration, which I'll put up next on the blog.


Thursday, 6 October 2011

Felt Pot Experiments continue

I was thinking that I would like to make the felt more robust and to be able to rub the felt both from the inside of the pot and the outside at the same time. I thought that if I made a different kind of mould with friction beads inside, this might work.


So I made a mould using a cut off of a pair of tights filled with aduki beans. 


I then applied the wool wisps in the same way as previously but in more dense layers. 


The pot was then rolled around on the felting mat. This was very much like kneading dough and I found that I could be quite brutal, slamming the mould down and pushing it around.

I also though that it would be a good idea to step up the heat to aid the felting process, so I gave the pot several shots of steam from a steam cleaner. 

It became clear that this was working very well and that the felt had formed into a tougher shell than in the previous experiments.

So I then put the pot in the tumble dryer, wrapped up in a piece of net curtain, a bit like a steamed pudding.


I gave it 15 mins on a high temperature and then took it out, opened up the tights and removed the beans. The empty tights were then peeled away, the pot rinsed and left to dry.


This has resulted in a much less fragile object. I am going to see what this technique offers in the next few experiments.

Wednesday, 5 October 2011

Felt pot experiments

Well, these are the first attempts in a series of felt making
experiments. I am testing how much wool to use to get the 
shape to hold and also to see how little you can use and 
keep some of the translucency. I have used a balloon as the
form and then have worked alternate layers of horizontal 
and vertical wool wisps, spraying the balloon first with a 
dilution of washing up liquid and water and spraying as
the wool is layered up. The green bowl is quite fragile, 
the larger pot is thicker and heavier but I had to inflate another 
balloon whilst initially drying out the pot to keep the shape.


Once the layers are in place, I then spent about 15 mins 
for the small green one and 30 mins for the larger pot, 
rubbing and massaging the felt using both a felting mat 
(beach mat) and just by hand. This was a bit like a scalp 
massage and was quite nice to do!

Friday, 30 September 2011

frei-tag lab's birthday

frei-tag lab is born today  


frei-tag - Friday
Friday - O.E. frigedæg "Frigga's day," from Frige, gen. of Frig , Germanic goddess of married love
frei-tag - 'free day'


lab - abbreviation of laboratoy
laboratory - c.1600, "building set apart for scientific experiments," from M.L. laboratorium "a place for labor or work," from L. laboratus, pp. of laborare "to work"


frei-tag lab is intended as a 'show and tell' space for experiments in crafting and making. 


frei-tag lab will be updated every Friday with work from during the week.


frei-tag lab is speculative. Hopefully, some experiments will work, others are likely to fail. Here's hoping that some of the failures are spectacular!